How to Upload a Different Sketch Over a Previous Sketch on an Arduino
OK don't forget - you lot have to go though the Lesson #0 steps to install drivers, software, and verify that your Arduino is powered, has the bootloader installed and shows up equally a COM/Series port... Don't keep unless that has been done!
Startup!
Double click the Arduino software icon on your desktop
![]()
To open the workspace, also called the IDE. IDE stands for Integrated Development Eastnvironment. Basically, a word processor for writing code. The full proper noun is actually a mouthfull, so nosotros say I.D.Eastward. (Middle Dee Eee)
Anyhow, it looks like this:

The main IDE window has multiple tabs and areas, we'll visit all of these shortly, so keep your heart on this diagram!

Getting Ready To Do This Thing!
We're going to jump right in! Before y'all tin run a program on the Arduino you demand to tell the IDE where to find information technology and what kind you're going to be programming (equally nosotros mentioned in lesson #0 there are dozens of types of Arduinos!)
Select Board Type Arduino UNO
Under the Tools carte du jour, find the Board submenu and navigate that to select Arduino (Genuino) UNO.
Yous should utilize this lath selection also if y'all are using an Adafruit Metro or any other Arduino UNO compatible

Select Correct Serial Port
Most of import you will too need to select the correct Series port. This is where people can get tripped up. The expert news is if you have a 18-carat Arduino UNO, the name will announced side by side to the serial port card item to make it piece of cake to option out!


If you have an Arduino compatible like Adafruit Metro, y'all may not come across anything afterward the Serial port name, simply it will withal be the only option available that is not COM1 or something with Bluetooth in the name

~~ Hints! ~~
Windows: It will never be COM1 don't pick that one. You should only take one other option.
Mac Bone X and Linux: It will never be an option with 'bluetooth' in the name, look for /dev/cu.usbmodem or /dev/cu.usbserial or /dev/ttyUSB or similar!
Have lots of Series ports? Try unplugging your Arduino and seeing which port disappears next time you look at the Ports list!
The lath and series port preferences are saved so you but have to set up it once, the program will call up next fourth dimension it'due south run.
However, if yous have multiple Arduino's, they may be assigned difference COM ports. Then every time yous plug in a new Arduino, double bank check that the correct port and type is selected!
Open Blink Sketch
Sketches are petty scripts that you can transport to the Arduino to tell it how to act. Let's open up an Instance Sketch. Go to the File menu -> Examples -> 01.Basics -> Glimmer
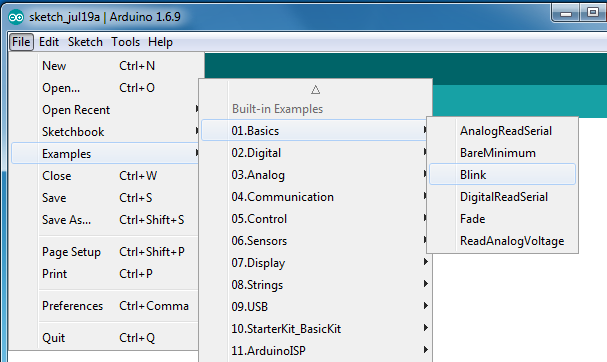
This should open up a new window that should now expect like this, with a bunch of text in the center white space. To a higher place the text is a tab labeled Blink

Verify / Compile
Let'south keep going! The showtime step to getting a Sketch ready for transfer over to the arduino is to Verify/Compile it. That means check information technology over for mistakes (sort of similar spell-checking or grammatical editing) and then interpret information technology into an app that is uniform with the Arduino hardware.
Verify: Like having a friend look over your homework essay before handing it in, verifying ways the Arduino software will check over and look for typos, common errors - it can't catch all errors, just like a spellcheck wont be able to tell that you lot spelled "bear" like "blank" by blow since both are proper words
Compile: cheque your music actor and you lot'll probably detect you ain at least one compilation, which means a drove that someone put together in a specific order. When Arduino compiles your sketch, it is putting/arranging it together into the right order for your Arduino hardware board to be able to run
While in theory you could have Arduino practise each i separately, it's faster to but have it do both at the same time
You tin can offset the action via the Sketch bill of fare

After a few seconds, you should see the message Washed compiling. in the Condition Bar and Sketch uses ... bytes (x%) of program storage infinite (or something similar) in the Program Notification Area.
This means the sketch was well-written and is prepare for uploading to the Arduino lath!

Upload
Ready for the moment of truth? Now it's time to upload your very first sketch. Make certain the Arduino is plugged in, the light-green light is on and the correct board and Series Port is selected.
Select Upload from the Sketch carte du jour

After a few seconds you should get this screen, with the message Done uploading. in the condition bar.

Things That Can Go Incorrect...
Arduino bootloader doesn't answer
If y'all get the post-obit error message avrdude: stk500_getsync(): not in sync or avrdude: stk500_recv(): programmer is not responding that means that the Arduino bootloader is not responding
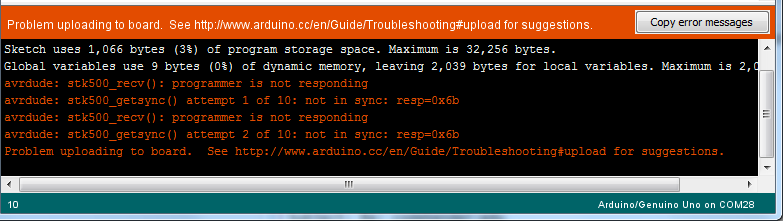
This error can be caused by a lot of problems. Check the following:
- Is the correct Arduino Board selected?
- Is the correct Serial Port selected?
- Is the correct driver installed?
- Is something connected to the Reset pivot or pressing the reset button?
- Try disconnecting all connected shields, jumper wires and components
- Is the chip inserted into the Arduino properly? (If you built your own arduino or take burned the bootloader on yourself)
- Does the chip have the correct bootloader on information technology? (If you congenital your own arduino or take burned the bootloader on yourself)
You can besides check Lesson #0 on how to verify if the bootloader is installed
Tin't open up serial port device
If you get an error like avrdude: ser_open(): can't open device information technology probable means your Arduino got disconnected from USB somehow

This error tin be caused by a few possible problems. Check the following:
- Is the right Serial Port selected?
- Is the correct driver installed?
- Try unplugging/replugging the USB cable
- Endeavor another USB cable or USB port
- Your calculator's USB arrangement may have crashed. Shutdown your reckoner, disconnect power, wait 3 minutes then restart information technology
Video of all steps
Hither is a video showing the timing of the steps described and so far, opening the Blink sketch and setting the lath and serial port.
Lookout man!
If yous have a UNO Arduino, the upload process is quite fast: Once you lot click Upload from the software the IDE will ask the Arduino to reset itself into the bootloader and immediately beginning uploading the glimmer sketch. After uploading, the sketch is speedily verified - the IDE asks the Arduino 'please repeat back what I simply asked to you to do' - and reset again to start running the sketch.
The piddling translucent Fifty LED will start blinking on and off, a second on and a 2nd off.
Here'due south a looping animation showing upload and and so iii blinks: notice the RX and TX LEDs blink during upload, simply it happens very fast!
This guide was first published on Sep 01, 2016. It was last updated on Sep 01, 2016.
This page (Upload Your Outset Sketch) was last updated on Apr xiv, 2022.
Text editor powered past tinymce.
grangeonswevarned.blogspot.com
Source: https://learn.adafruit.com/ladyadas-learn-arduino-lesson-number-1/upload-your-first-sketch
0 Response to "How to Upload a Different Sketch Over a Previous Sketch on an Arduino"
Post a Comment